The Newsroom
Guidelines for Area Separation Wall Construction
Get Answers and Assemble with Confidence
Introduction
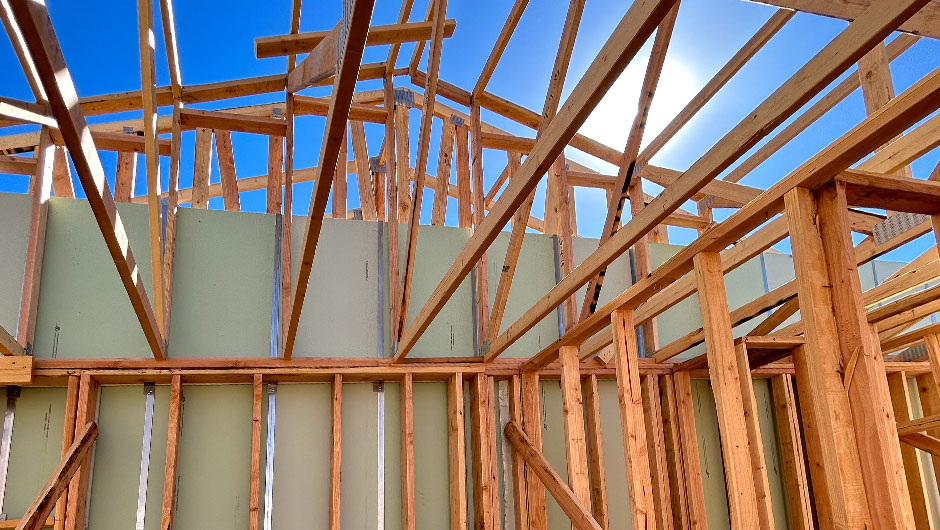
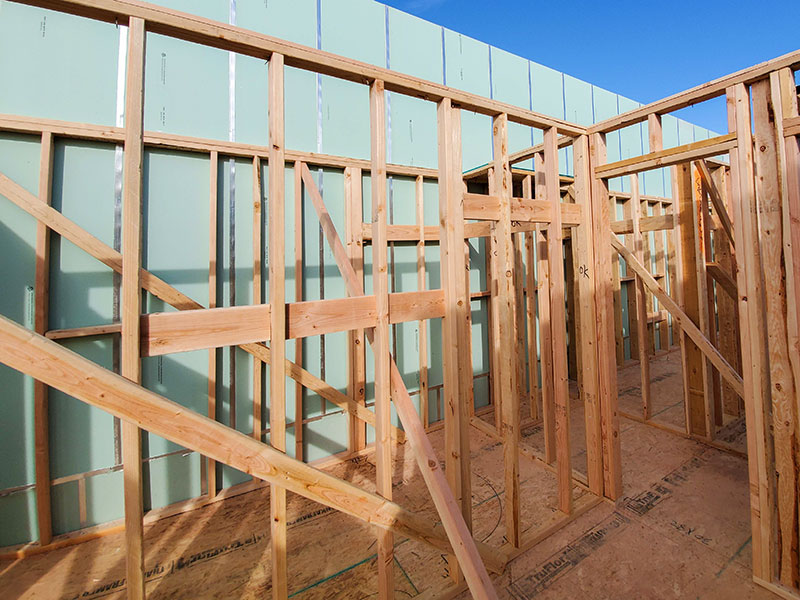
Over the last few years, many cities have experienced an increase in mixed-use and multifamily construction resulting in a transition in the building industry away from single-family home construction. Such a transition brings about a greater awareness for construction professionals around the unique code requirements for dwelling separation. The PABCO® H-Stud Area Separation Wall System (ASW) meets or exceeds all the code requirements for dwelling separation while providing low cost and efficient construction.
What are Code Requirements for Dwelling Separation?
Whether the construction falls under the jurisdiction of International Residential Code (the IRC for townhomes) or International Building Code (the IBC for multifamily or mixed-use), the requirements are essentially the same. All party walls (IBC fire wall) and common walls (IRC) must maintain the following while providing a two-hour fire-resistance rating:
- Structural stability which allows one side of the wall to collapse under fire conditions while leaving the other side intact
- Vertical continuity from foundation to either the roof or parapet
- Horizontal continuity from one exterior wall to the opposite exterior wall
In addition, there are requirements for allowed penetrations that will be discussed later as the H-Stud ASW is a special case.
What is an H-Stud ASW?
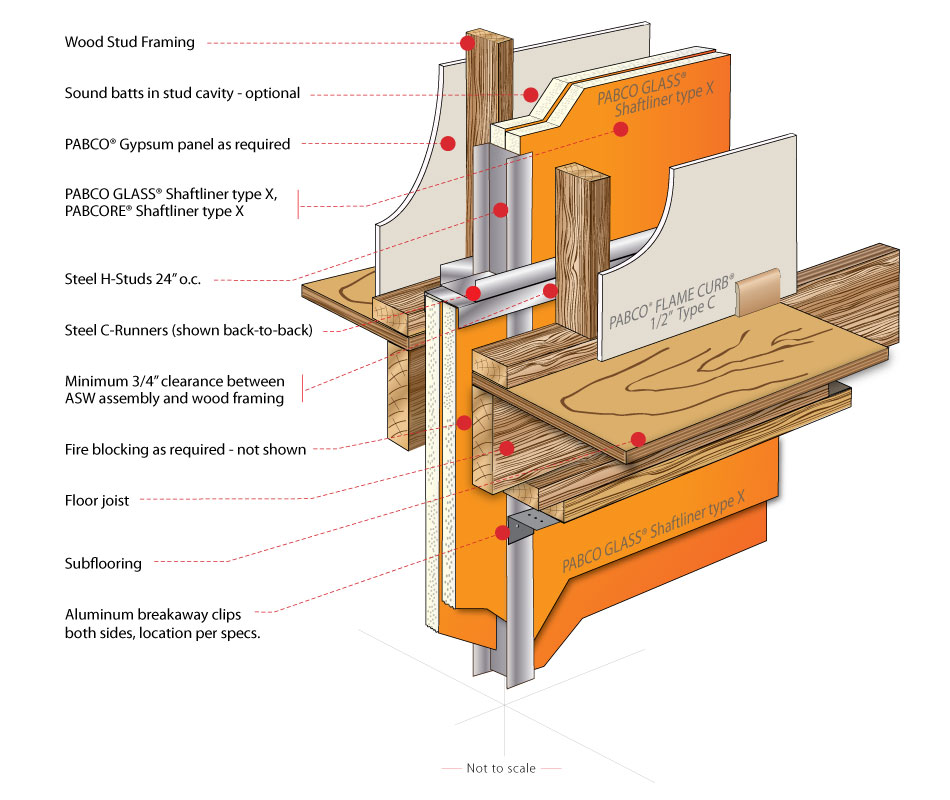
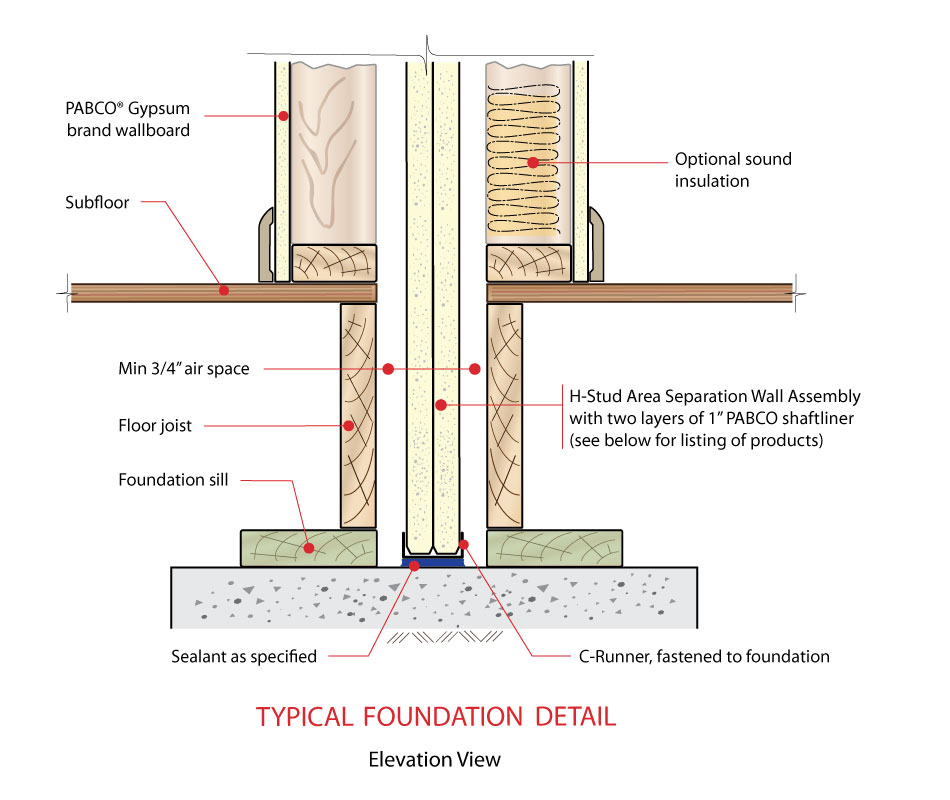
The H-Stud ASW is a non-load bearing, lightweight, two-hour fire-resistance rated assembly specifically designed to protect occupants in attached multi-unit residences. Extending continuously from the foundation to, or through the roof, the H-Stud ASW provides sufficient structural stability under fire conditions to allow collapse of construction on either side without the collapse of the wall. The H-Stud ASW will also provide an STC of 60-64 when required and constructed according to PABCO Gypsum specifications. The PABCO H-Stud ASW can be constructed up to 66 feet tall, while providing the highest level of fire and sound performance.
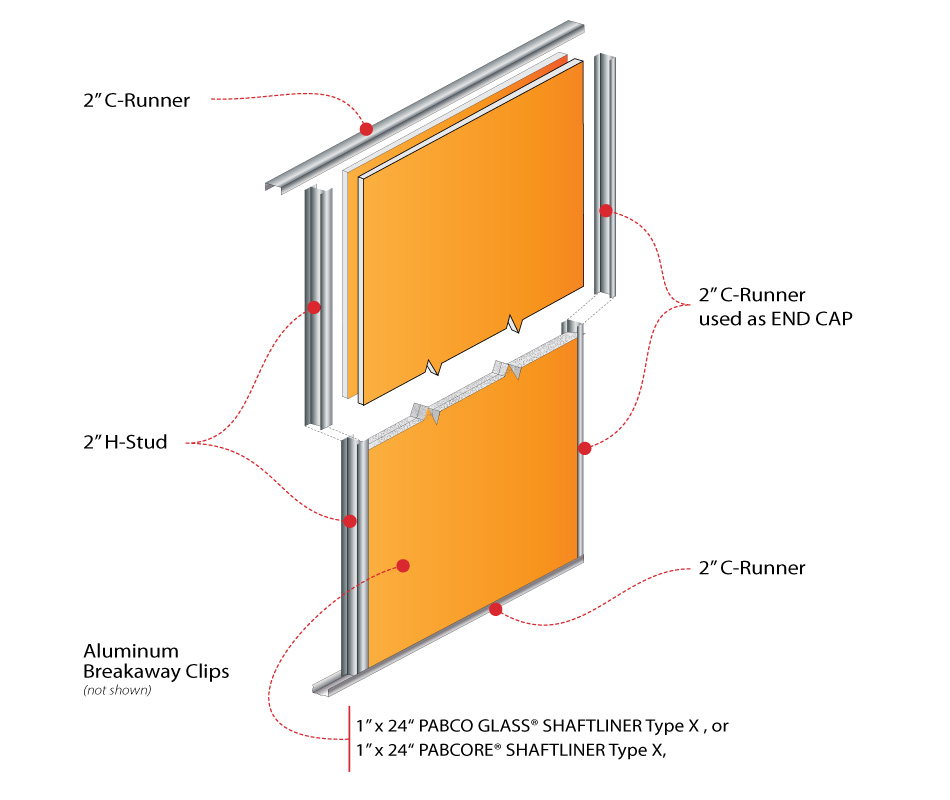
PABCO® ASW assemblies consist of two different wall types, each with specific functions. First, there is the central common wall comprised of two layers of 1” PABCORE® Shaftliner or 1” PABCO GLASS® Shaftliner inserted vertically into H-Studs. This portion of the ASW provides the two-hour fire-resistance rating and the horizontal and vertical continuity.
Second, is the flanking wall, one on either side of the central wall. These wood-framed walls are set at a minimum 3/4” from the central wall. They can be load-bearing or non-load bearing depending on the need. The flanking walls are non-fire-resistance rated partitions that provide:
- Structural independence between dwelling units
- Heat resistance that keeps the non-fire side under the temperature required
- An aesthetic surface for the living areas
What are the Components of PABCO ASW Assemblies?
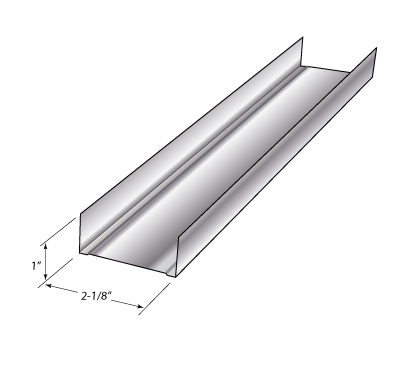
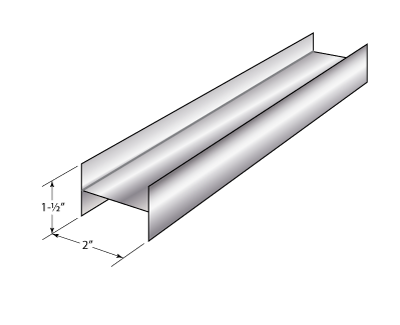
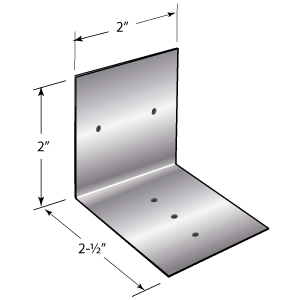
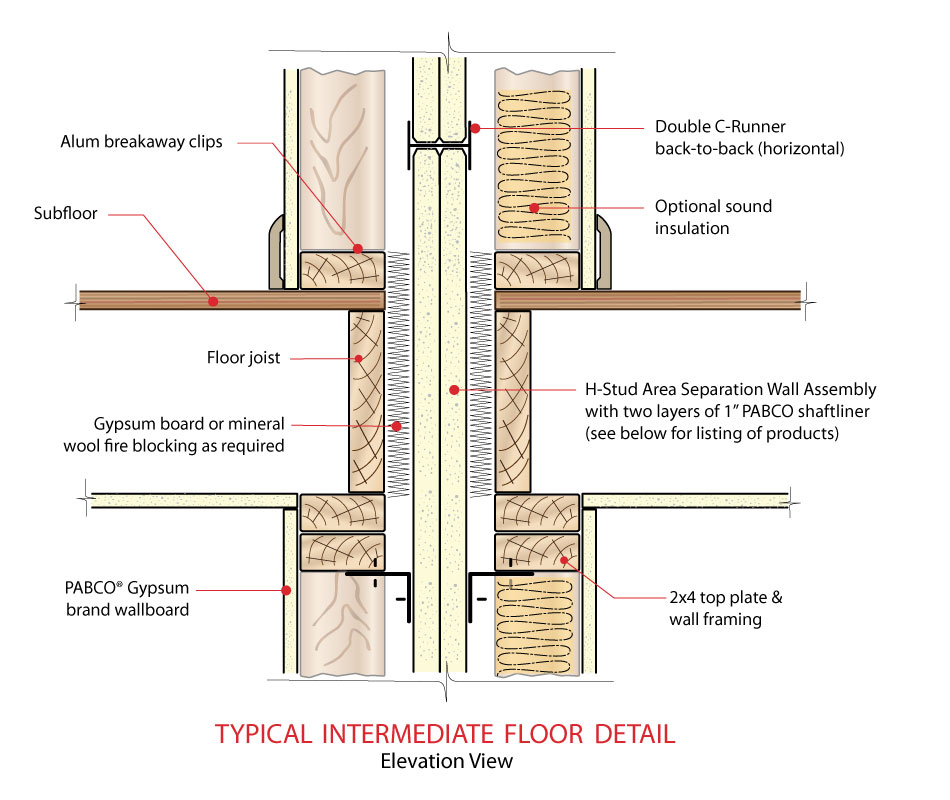
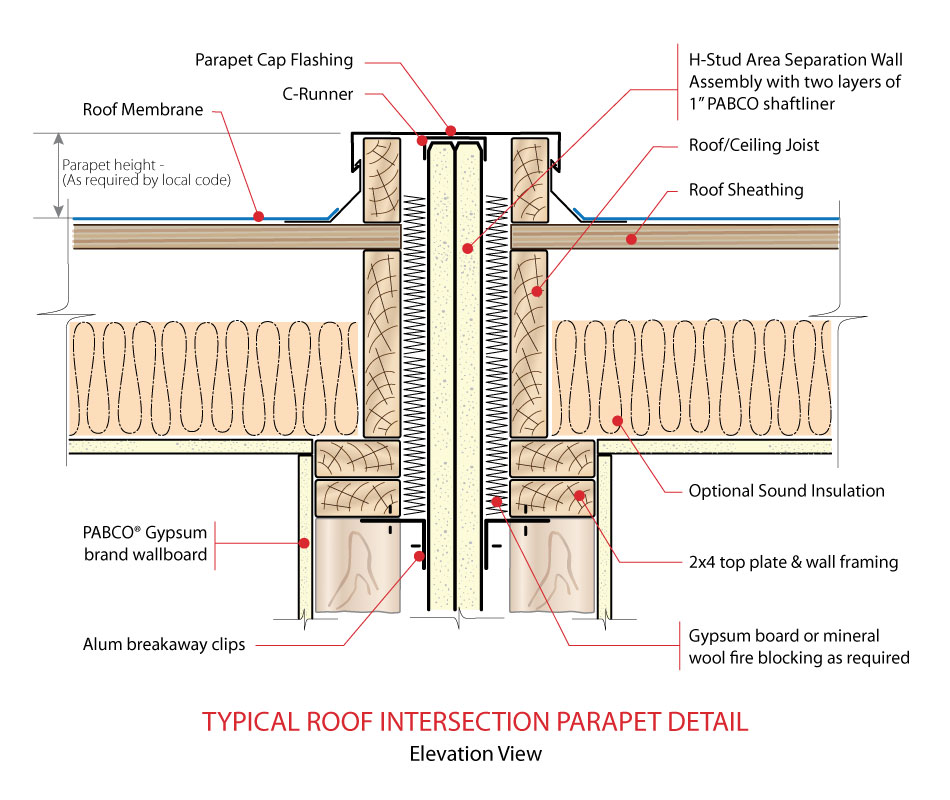
The key component of the H-Stud ASW is a continuous double layer of 1-inch thick, Type X, non-combustible PABCORE® Shaftliner or PABCO GLASS® Shaftliner panels installed in a continuous assembly from the foundation to the roof, and from the front to the back wall. This construction restricts the spread of fire while maintaining sufficient structural stability under fire conditions to allow collapse of construction on either side without the collapse of the ASW or compromising structural integrity. Structural support is provided by steel C-Runners and H-Studs. Horizontal structural support is provided by L-Shaped “breakaway” aluminum clips.
In addition, there are framing components as detailed below.
 |
 |
 |
 |
| Steel C-Runners along the top, bottom, and perimeter of 1” shaftliner panels | Steel H-Studs between shaftliner panels | Aluminum Breakaway Clips attached to H-studs and adjacent framing | Wood framing (for flanking walls) |
Gypsum panel products used in the PABCO ASW are 1” PABCORE Shaftliner or 1” PABCO GLASS Shaftliner for the central wall, while any interior product can be installed on the flanking walls, including 1/2” Regular wallboard or any QuietRock® sound damped panel.
The components are held together using either pan head screws for attaching C-Runner to C-Runner and clips to H-Studs, or Type W drywall screws for attaching clips to flanking wall and gypsum panels to framing. Other components allowed in PABCO ASW assemblies include insulation, acoustic sealant, fireblocking (as required), and air sealant material. While these components are not a part of the tested system, they can help improve the fire, sound, and energy performance of the assembly.
How are PABCO ASW Assemblies Installed?
Starting at the foundation, PABCO ASW central walls are constructed one level (length of shaftliner panel) at a time up to the roof or parapet, and one section (width of shaftliner panel) at a time from exterior wall to exterior wall.
Installation from the Foundation
First, position a C-Runner a minimum of 3/4” from the framed wall of the adjacent unit and attach it to the foundation with power-driven fasteners at both ends spaced 24” o.c. Leaving 1/4” gap, continue laying and fastening the bottom C-Runner as needed, ensuring that the C-Runner gaps do not occur at an H-stud. For improved acoustical performance, caulk under the C-Runner at the foundation floor with QuietSeal® Pro acoustical sealant.
Shaftliner Panel Installation
Next, for easy panel insertion, attach a C-Runner vertically to one end of the bottom C-Runner with 1/2” pan head screws at the corners, on both sides. Insert two 1” shaftliner panels vertically in the C-Runners and install the H-stud at the edge of the liner panels. Continue in this manner, alternately, until the wall is completed. Cap the top and side of the wall section with C-Runners and fasten at all corners, both sides, with 1/2” pan head screws.
Intermediate Floor Installation
Continuing upward, attach a C-Runner, with the legs up, to the top track of the lower floor with double 1/2-inch pan head Type S screws at the ends and 24” o.c. down the length of the wall. Assemble the liner and H-studs in the same manner as the previous floors, including capping the top and sides with C-Runners, fastened as detailed. Fireblocking must be installed on both sides of the central wall at each floor to completely fill the wall cavity, using mineral wool insulation or gypsum wallboard.
Roof or Parapet Intersection
Continue installing H-Studs and liner panels for succeeding floors as described. At the roof intersection, cut the liner panels and H-Studs to match the roof pitch and length, and cap the liner panels and H-Studs with the C-Runner. If the ASW terminates at a parapet, continue to the top of the parapet wall and cap with the C-Runner as before.
Where are the Aluminum Breakaway Clips Installed?
The aluminum breakaway clips provide stability for the central wall under normal conditions, by attaching it to the flanking walls while maintaining structural independence. The clips are manufactured to soften in the event of a fire. This allows the fire-side dwelling to collapse and detach from the central wall, leaving the other side dwelling unscathed.
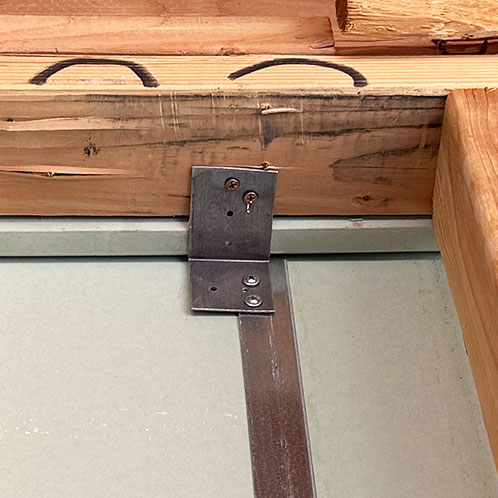
After the framing for the flanking walls have been installed, the clips are attached to the H-Studs using pan head screws and to the adjacent wood framing using Type W screws.
For buildings up to 44 feet in height, clips must be installed every 5 feet, vertically spaced on every H-Stud, from foundation to roof/parapet, on both sides of the central common wall. Horizontal bridging may be installed on the flanking wall if needed.
For buildings that are up to 66 feet in height, clip placement differs at specific heights. For the bottom 22 feet, clips must be installed every 39 inches, vertically spaced on every H-Stud, from foundation to roof/parapet, on both sides of the central common wall. For the remaining height, up to 66 feet, clips must be installed every 5 feet, vertically spaced on every H-Stud, from foundation to roof/parapet, on both sides of the central common wall. At both heights, horizontal bridging may be installed in the flanking wall if needed.
Are there Alternate Designs of the PABCO ASW?
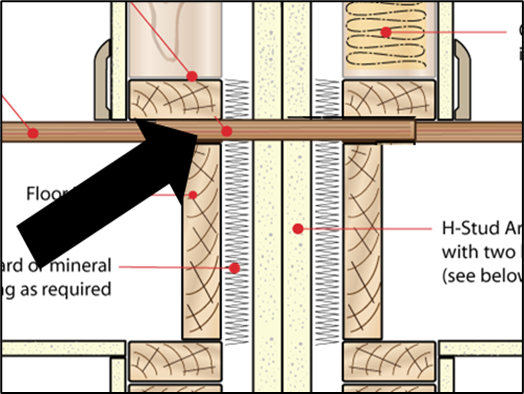
There are two modifications to PABCO ASW assemblies that are accepted by building codes. First, in seismic design categories D-F, the ASW central wall may be penetrated by floor sheathing as required by building structural design, as shown in the illustration below.
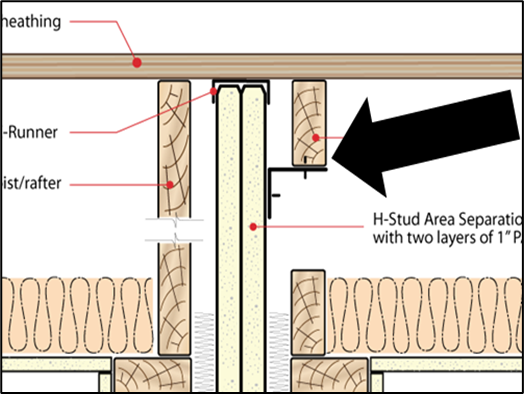
Second, unoccupied attic spaces do not require a flanking wall, provided the central wall can be attached to supporting framing, via clips, as shown in the illustration below. Insulation or batten strips are required over H-Studs.
What are Common Mistakes made in ASW Construction?
The common central wall can never be penetrated. This is a requirement of the building codes. However, the flanking wall can be penetrated with electrical, mechanical, or plumbing equipment, provided the penetrations are properly firestopped.
Using an H-Stud in lieu of back-to-back C-Runners to horizontally secure the shaftliner panels is also not acceptable.
Good construction practices should always be followed, but sometimes, accidents can occur and the shaftliner panels can become damaged. Repair is considered on a case-by-case basis. Please contact PABCO Technical Services for further guidance on such repairs.
Where Can Additional Information be Found?
You can find further details on H-Stud ASW assemblies in the PABCO Gypsum Area Separation Wall brochure and in the Gypsum Association document GA-620 Gypsum Area Separation Firewall.
You can also contact PABCO Technical Services at (866) 282-9298 or techservice@pabcogypsum.com for more information.